quinta-feira, 7 de maio de 2020

CEH Practical: Information-Gathering Methodology


Information gathering can be broken into seven logical steps. Footprinting is performed during the first two steps of unearthing initial information and locating the network range.


Footprinting

Footprinting is defined as the process of establishing a scenario or creating a map of an organization's network and systems. Information gathering is also known as footprinting an organization. Footprinting is an important part of reconnaissance process which is typically used for collecting possible information about a targeted computer system or network. Active and Passive both could be Footprinting. The example of passive footprinting is assessment of a company's website, whereas attempting to gain access to sensitive information through social engineering is an example of active information gathering. Basically footprinting is the beginning step of hacker to get hacked someone because having information about targeted computer system is the main aspect of hacking. If you have an information about individual you wanna hack so you can easily hacked that individual. The basic purpose of information gathering is at least decide what type of attacks will be more suitable for the target. Here are some of the pieces of information to be gathered about a target
during footprinting:
  • Domain name
  • Network blocks
  • Network services and applications
  • System architecture
  • Intrusion detection system
  • Authentication mechanisms
  • Specific IP addresses
  • Access control mechanisms
  • Phone numbers
  • Contact addresses
Once this information is assemble, it can give a hacker better perception into the organization, where important information is stored, and how it can be accessed.

Footprinting Tools 

Footprinting can be done using hacking tools, either applications or websites, which allow the hacker to locate information passively. By using these footprinting tools, a hacker can gain some basic information on, or "footprint," the target. By first footprinting the target, a hacker can eliminate tools that will not work against the target systems or network. For example, if a graphics design firm uses all Macintosh computers, then all hacking software that targets Windows systems can be eliminated. Footprinting not only speeds up the hacking process by eliminating certain tool sets but also minimizes the chance of detection as fewer hacking attempts can be made by using the right tool for the job. Some of the common tools used for footprinting and information gathering are as follows:
  • Domain name lookup
  • Whois
  • NSlookup
  • Sam Spade
Before we discuss these tools, keep in mind that open source information can also yield a wealth of information about a target, such as phone numbers and addresses. Performing Whois requests, searching domain name system (DNS) tables, and using other lookup web tools are forms of open source footprinting. Most of this information is fairly easy to get and legal to obtain.

Footprinting a Target 

Footprinting is part of the preparatory pre-attack phase and involves accumulating data regarding a target's environment and architecture, usually for the purpose of finding ways to intrude into that environment. Footprinting can reveal system vulnerabilities and identify the ease with which they can be exploited. This is the easiest way for hackers to gather information about computer systems and the companies they belong to. The purpose of this preparatory phase is to learn as much as you can about a system, its remote access capabilities, its ports and services, and any specific aspects of its security.

DNS Enumeration

DNS enumeration is the process of locating all the DNS servers and their corresponding records for an organization. A company may have both internal and external DNS servers that can yield information such as usernames, computer names, and IP addresses of potential target systems.

NSlookup and DNSstuff

One powerful tool you should be familiar with is NSlookup (see Figure 2.2). This tool queries DNS servers for record information. It's included in Unix, Linux, and Windows operating systems. Hacking tools such as Sam Spade also include NSlookup tools. Building on the information gathered from Whois, you can use NSlookup to find additional IP addresses for servers and other hosts. Using the authoritative name server information from Whois ( AUTH1.NS.NYI.NET ), you can discover the IP address of the mail server.

Syntax

nslookup www.sitename.com
nslookup www.usociety4.com
Performing DNS Lookup
This search reveals all the alias records for www.google.com and the IP address of the web server. You can even discover all the name servers and associated IP addresses.

Understanding Whois and ARIN Lookups

Whois evolved from the Unix operating system, but it can now be found in many operating systems as well as in hacking toolkits and on the Internet. This tool identifies who has registered domain names used for email or websites. A uniform resource locator (URL), such as www.Microsoft.com , contains the domain name ( Microsoft.com ) and a hostname or alias ( www ).
The Internet Corporation for Assigned Names and Numbers (ICANN) requires registration of domain names to ensure that only a single company uses a specific domain name. The Whois tool queries the registration database to retrieve contact information about the individual or organization that holds a domain registration.

Using Whois

  • Go to the DNSStuff.com website and scroll down to the free tools at the bottom of the page.
  • Enter your target company URL in the WHOIS Lookup field and click the WHOIS button.
  • Examine the results and determine the following:
    • Registered address
    • Technical and DNS contacts
    • Contact email
    • Contact phone number
    • Expiration date
  • Visit the company website and see if the contact information from WHOIS matches up to any contact names, addresses, and email addresses listed on the website.
  • If so, use Google to search on the employee names or email addresses. You can learn the email naming convention used by the organization, and whether there is any information that should not be publicly available.

Syntax

whois sitename.com
whois usociety4.com

Related posts
  1. Hacking To The Gate Lyrics
  2. Hacking Academy
  3. Hacking Significado
  4. Elladodelmal
  5. Certificacion Hacking Etico
  6. Hacking Meaning

Kali Linux VM Installation And Setup

Preface

From time to time I realize that certain tasks that are trivial for me are not necessarily easy for others, especially if they are just getting started with IT security stuff.

As I am going to be a Facilitator at SANS Munich 2015 on SEC 401, plus we have a few people at work who are just dipping their toe into the wonderful world of Kali Linux, it seemed like a good opportunity to make a short getting started / installation guide on the Kali VMWare VMs that you can download and quickly get started.

On top of that, when I check the statistics of the blog, I always see that the most popular posts are the detailed howtos and tutorials and I assume that it is because there is a need for this kind of posts too, so here it goes! :)


Step -1: Check in your BIOS/UEFI if virtualization is enabled

We are going to use virtualization, so it would be nice to enable it, right?

In BIOS/UEFI menus this is somewhere around "Security" and/or "Virtualization" and it is something like "Intel (R) Virtualization Technology" and "Intel (R) VT-d Feature" that needs to be set to "Enabled".


Step 0: Install VMWare Player or VMWare Workstation

The Kali Linux VMs are VMWare-based, so you need to install VMWare Player (free), VMWare Workstation (paid) or VMWare Fusion (paid, for OS-X).

The more desirable choice is to use VMWare Workstation or VMWare Fusion, as they have a Snapshot feature, while with VMWare Player, you are forced to take a full copy in order to have a sort of rollback feature.


Step 1: Download Kali VM

We need to download the Kali VMs from the "Custom Kali Images" download site, where you can find a 64 bit (amd64) and a 32 bit PAE (i686) too.

There are also Torrent files for the images and based on experience, using Torrent is much more faster and reliable than the HTTP download, so if you can, use that!

Once you have downloaded the VMs, do not forget to check their SHA1 hash!!! On Linux, you can simply use the sha1sum command at a terminal. For Windows, you can use something like the MD5 & SHA Checksum Utility.


Step 2: Change Kali VM default root password

The Kali VM comes with a preset root password, which is "toor" (without the quotes), therefore, it has to be changed.

Here is how you do it:
root@kali:~# passwd
Enter new UNIX password:
Retype new UNIX password:
passwd: password updated successfully


Step 3: Change Kali VM default SSH keys

The Kali VM also comes with SSH preinstalled, so we need to change the SSH keys to avoid SSH MiTM attacks.
Here is how you do it:
root@kali:~# cd /etc/ssh/
root@kali:/etc/ssh# mkdir default_kali_keys
root@kali:/etc/ssh# mv ssh_host_* default_kali_keys/
root@kali:/etc/ssh# dpkg-reconfigure openssh-server
Creating SSH2 RSA key; this may take some time ...
Creating SSH2 DSA key; this may take some time ...
Creating SSH2 ECDSA key; this may take some time ...
insserv: warning: current start runlevel(s) (empty) of script `ssh' overrides LSB defaults (2 3 4 5).
insserv: warning: current stop runlevel(s) (2 3 4 5) of script `ssh' overrides LSB defaults (empty).

Now we can check if the keys are really changed:

root@kali:/etc/ssh# md5sum /etc/ssh/*key*
md5sum: /etc/ssh/default_kali_keys: Is a directory
6abe210732068fa7ca95854c3078dba5 /etc/ssh/ssh_host_dsa_key
1b5f3c1a1b5c48cc3cce31b116e8b6f8 /etc/ssh/ssh_host_dsa_key.pub
8f0f60855e5ab8cac8103d64faab090f /etc/ssh/ssh_host_ecdsa_key
aace49ae9236815c9a1672f8ecb2b1e2 /etc/ssh/ssh_host_ecdsa_key.pub
cf861a9f743fb4584ab246024465ddf1 /etc/ssh/ssh_host_rsa_key
d5d65d8ad023a6cb1418ae05007bc6d3 /etc/ssh/ssh_host_rsa_key.pub
root@kali:/etc/ssh# md5sum /etc/ssh/default_kali_keys/*key*
c8d5b82320a4ddde59d0e2b6d9aad42a /etc/ssh/default_kali_keys/ssh_host_dsa_key
6b12ddecd463677cde8097e23d0f219a /etc/ssh/default_kali_keys/ssh_host_dsa_key.pub
fecf056571a3dfbf3635fc2c50bf23c5 /etc/ssh/default_kali_keys/ssh_host_ecdsa_key
e44b7c50635de42e89b3297414f5047d /etc/ssh/default_kali_keys/ssh_host_ecdsa_key.pub
e9e0267484e020878e00a9360b77d845 /etc/ssh/default_kali_keys/ssh_host_rsa_key
ceee93d7bbc9f9b9706e18f23d4e81f1 /etc/ssh/default_kali_keys/ssh_host_rsa_key.pub

Step 4: Update Kali VM

Next you need to update your Kali VM so that everything is patched.

Here is how you do it:

root@kali:~# apt-get update
Get 1 http://http.kali.org kali Release.gpg [836 B]
Get:2 http://security.kali.org kali/updates Release.gpg [836 B]
********************************* SNIP *********************************
Fetched 16.7 MB in 14s (1,190 kB/s)
Reading package lists... Done
root@kali:~# apt-get upgrade
eading package lists... Done
Building dependency tree
Reading state information... Done
The following packages have been kept back:
********************************* SNIP *********************************
The following packages will be upgraded:
********************************* SNIP *********************************
241 upgraded, 0 newly installed, 0 to remove and 16 not upgraded.
Need to get 740 MB of archives.
After this operation, 130 MB disk space will be freed.
Do you want to continue [Y/n]? Y
Get:1 http://security.kali.org/kali-security/ kali/updates/main libc6-i386 amd64 2.13-38+deb7u7 [4,044 kB]
Get:2 http://http.kali.org/kali/ kali/main base-files amd64 1:1.1.0 [77.5 kB]
********************************* SNIP *********************************
root@kali:~#


Step 5: Create a Snapshot/Copy the VM

Once you are done with all the above, you can make a Snapshot in case of VMWare Workstation or copy the files of the VM in case of VMWare Player, so that you can roll back to this clean stat in case you misconfigure something.

Hope this was helpful. Happy hacking!


Related word
  1. Elhacker Ip
  2. Crack Definicion
  3. Google Hacking Search
  4. Hacking 101
  5. Hacking Etico Certificacion
  6. Programas De Hacker

quarta-feira, 6 de maio de 2020

ASIS CTF Quals 2015 - Sawthis Writeup - Srand Remote Prediction


The remote service ask for a name, if you send more than 64 bytes, a memory leak happens.
The buffer next to the name's is the first random value used to init the srand()


If we get this value, and set our local srand([leaked] ^ [luckyNumber]) we will be able to predict the following randoms and win the game, but we have to see few details more ;)

The function used to read the input until the byte \n appears, but also up to 64 bytes, if we trigger this second condition there is not 0x00 and the print shows the random buffer :)

The nickname buffer:


The seed buffer:


So here it is clear, but let's see that the random values are computed with several gpu instructions which are decompiled incorrectly:


We tried to predict the random and aply the gpu divisions without luck :(


There was a missing detail in this predcitor, but there are always other creative ways to do the things.
We use the local software as a predictor, we inject the leaked seed on the local binary of the remote server and got a perfect syncronization, predicting the remote random values:


The process is a bit ugly becouse we combined automated process of leak exctraction and socket interactive mode, with the manual gdb macro.


The macro:


Related news

  1. Wifi Hacking
  2. Que Significa Hat
  3. Raspberry Hacking
  4. Hacking Websites
  5. Python Desde 0 Hasta Hacking - Máster En Hacking Con Python
  6. Portatil Para Hacking
  7. Hacker Etico
  8. Hacking Quotes
  9. Certificacion Ethical Hacking
  10. Que Estudia Un Hacker
  11. Ethical Hacking
  12. Hacking Y Seguridad
  13. Growth Hacking Definicion

Scanning TLS Server Configurations With Burp Suite

In this post, we present our new Burp Suite extension "TLS-Attacker".
Using this extension penetration testers and security researchers can assess the security of TLS server configurations directly from within Burp Suite.
The extension is based on the TLS-Attacker framework and the TLS-Scanner, both of which are developed by the Chair for Network and Data Security.

You can find the latest release of our extension at: https://github.com/RUB-NDS/TLS-Attacker-BurpExtension/releases

TLS-Scanner

Thanks to the seamless integration of the TLS-Scanner into the BurpSuite, the penetration tester only needs to configure a single parameter: the host to be scanned.  After clicking the Scan button, the extension runs the default checks and responds with a report that allows penetration testers to quickly determine potential issues in the server's TLS configuration.  Basic tests check the supported cipher suites and protocol versions.  In addition, several known attacks on TLS are automatically evaluated, including Bleichenbacher's attack, Padding Oracles, and Invalid Curve attacks.

Furthermore, the extension allows fine-tuning for the configuration of the underlying TLS-Scanner.  The two parameters parallelProbes and overallThreads can be used to improve the scan performance (at the cost of increased network load and resource usage).

It is also possible to configure the granularity of the scan using Scan Detail and Danger Level. The level of detail contained in the returned scan report can also be controlled using the Report Detail setting.

Please refer to the GitHub repositories linked above for further details on configuration and usage of TLS-Scanner.

Scan History 

If several hosts are scanned, the Scan History tab keeps track of the preformed scans and is a useful tool when comparing the results of subsequent scans.

Additional functions will follow in later versions

Currently, we are working on integrating an at-a-glance rating mechanism to allow for easily estimating the security of a scanned host's TLS configuration.

This is a combined work of Nurullah Erinola, Nils Engelbertz, David Herring, Juraj Somorovsky, Vladislav Mladenov, and Robert Merget.  The research was supported by the European Commission through the FutureTrust project (grant 700542-Future-Trust-H2020-DS-2015-1).

If you would like to learn more about TLS, Juraj and Robert will give a TLS Training at Ruhrsec on the 27th of May 2019. There are still a few seats left.

Read more


  1. Hacking Etico
  2. Hacking For Dummies
  3. Hacking Hardware Tools
  4. Hacking Tutorials
  5. Hacking Articles
  6. Manual Del Hacker
  7. Nfc Hacking
  8. Growth Hacking Courses
  9. El Mejor Hacker Del Mundo
  10. Significado De Hacker
  11. Que Es Growth Hacking
  12. Herramientas Hacking Etico
  13. Hacking Bluetooth Speaker
  14. Como Empezar A Hackear

Kali Linux 2018.3 Release - Penetration Testing And Ethical Hacking Linux Distribution


Kali 2018.3 brings the kernel up to version 4.17.0 and while 4.17.0 did not introduce many changes, 4.16.0 had a huge number of additions and improvements including more Spectre and Meltdown fixes, improved power management, and better GPU support.

New Tools and Tool Upgrades

Since our last release, we have added a number of new tools to the repositories, including:
  • idb – An iOS research / penetration testing tool
  • gdb-peda – Python Exploit Development Assistance for GDB
  • datasploit – OSINT Framework to perform various recon techniques
  • kerberoast – Kerberos assessment tools

In addition to these new packages, we have also upgraded a number of tools in our repos including aircrack-ng, burpsuite, openvas,wifite, and wpscan.
For the complete list of updates, fixes, and additions, please refer to the Kali Bug Tracker Changelog.

Download Kali Linux 2018.3


If you would like to check out this latest and greatest Kali release, you can find download links for ISOs and Torrents on the Kali Downloads page along with links to the Offensive Security virtual machine and ARM images, which have also been updated to 2018.3. If you already have a Kali installation you're happy with, you can easily upgrade in place as follows.
root@kali:~# apt update && apt -y full-upgrade
If you come across any bugs in Kali, please open a report on our bug tracker. It's more than a little challenging to fix what we don't know about.

Making sure you are up-to-date


To double check your version, first make sure your network repositories is enabled.
root@kali:~# cat</etc/apt/sources.list
deb http://http.kali.org/kali kali-rolling main non-free contrib
EOF
root@kali:~#

Then after running apt -y full-upgrade, you may require a reboot before checking:
root@kali:~# grep VERSION /etc/os-release
VERSION="2018.3"
VERSION_ID="2018.3"
root@kali:~#


Read more


How To Change Facebook’s Default Theme To Any Color You Want

Change Facebook Theme Using Chrome Extension

How To Change Facebook's Default Theme To Any Color You Want

We are going to share an interesting trick on changing your Facebook default theme. You just need a Google Chrome extension to perform this trick. If you are among me who feels very fatigued with the look of Facebook's by default theme then this is a must-see post because you will find out the easiest trick to make your facebook more attractive than before.

Facebook is a social networking site which empowers people to connect with friends and people around. That's how Facebook is habitually introduced. However, Facebook is beyond the need of being introduced as almost everyone is on it.
   A couple of Days ago I was simply Surfing Google Chrome website and I somehow stumbled upon a Chrome Extension. Yes, a Chrome extension that will give your Facebook a Whole new look. I was apprehensive to try it, So I just installed it and checked my facebook. I was astonished to see my facebook homepage have all new look. I found it refreshing and decided to write steps on How to Change Facebook Themes using Chrome Extension.

How To Change Facebook's Default Theme To Any Color You Want

If You are among me who feels very fatigued with the look of Facebook's by default theme then this is a must-see post, Because you will find out the easiest trick to make your facebook more attractive than before. Simply follow the steps to know about it.

How to Change Facebook Theme Using Chrome Extension

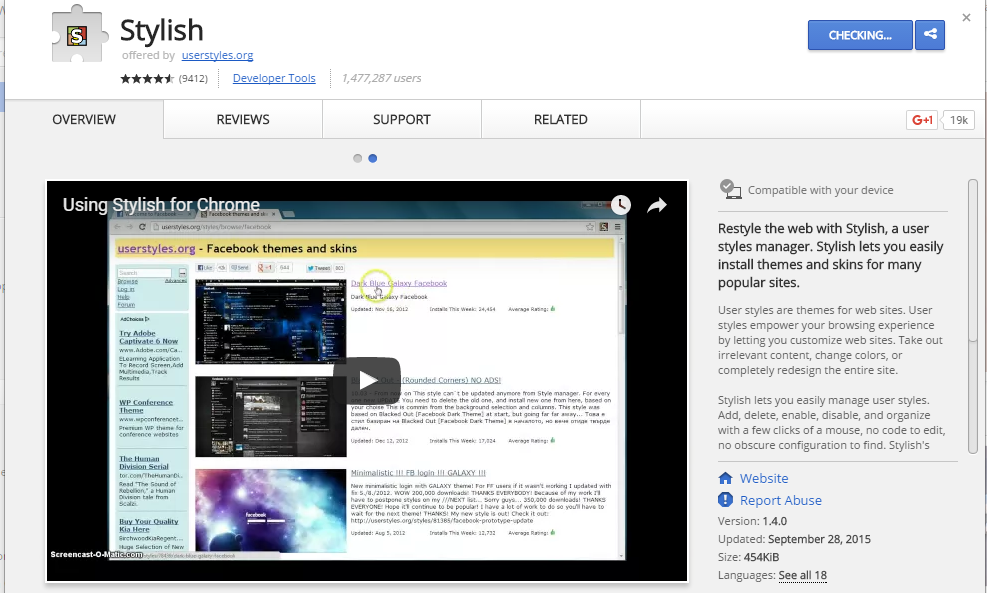
Step 1. Install Stylish for Chrome from the Chrome Web Store. It will take hardly a minute to get installed in your Chrome browser.
Change Facebook Theme Using Chrome Extension
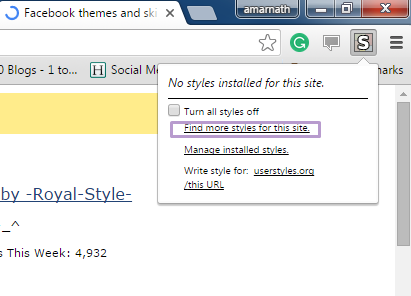
Step 2. Navigate to Facebook.com and click on the S button. Click on Find Styles for this Site to open a new tab with free themes to use for Facebook. Most of the themes are free and attractive too you can easily browse over the full website to discover your favorite theme.
Change Facebook Theme Using Chrome Extension
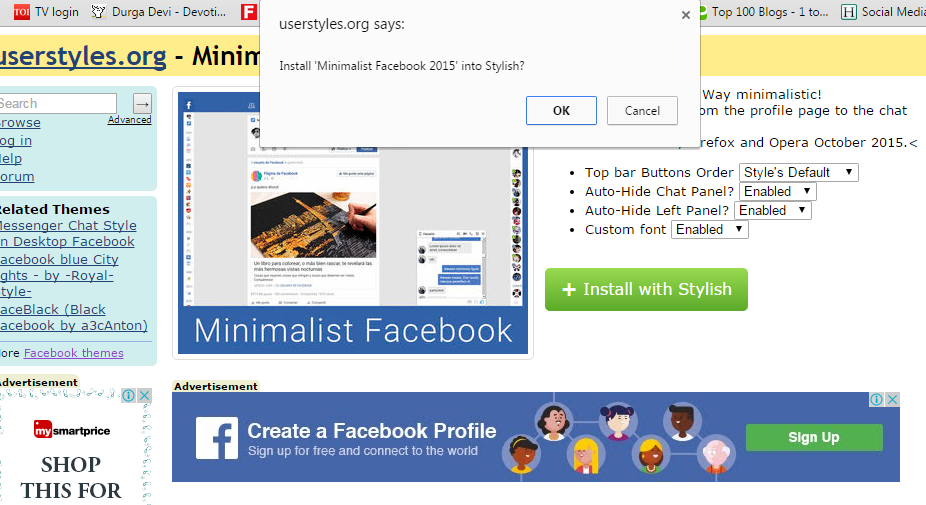
Step 3. Now You will be redirected towards https://userstyles.org Guess what! This site contains huge numbers of Facebook themes, One thing is for sure that you will be confused in-between what to select and which one to skip. Select any them and click on it. Now you will be given a full preview of your selected theme.
Change Facebook Theme Using Chrome Extension
Step 4. If everything is fine in the previewed theme, click on Install with Stylish button at the top right corner of the page. It will take few seconds or minutes depends on your theme size to be installed in Stylish Extension, once installed you will be notified with a success message.
Change Facebook Theme Using Chrome Extension
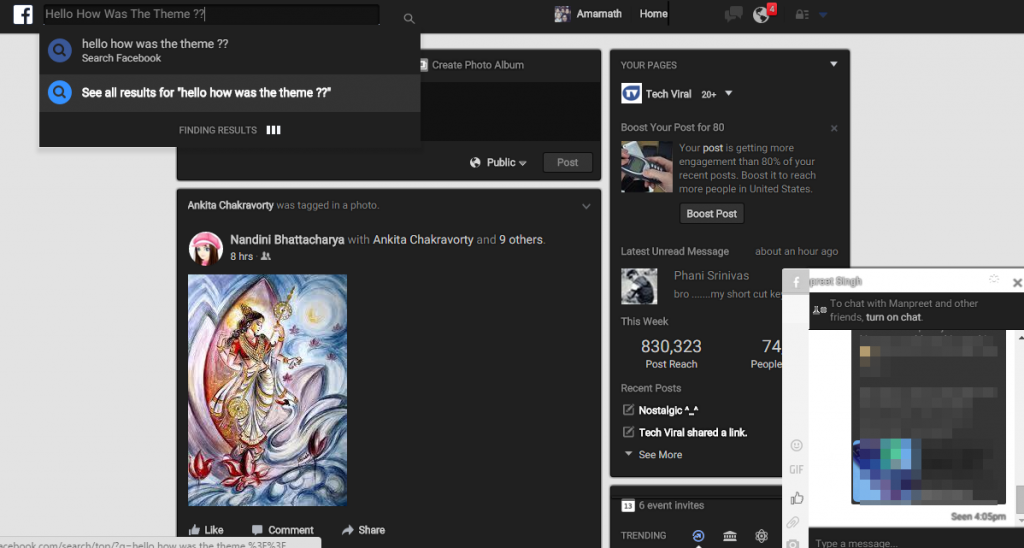
Step 5. Now whenever you open Facebook, it will show the theme that you have installed with Stylish instead of the boring old blue theme.
Change Facebook Theme Using Chrome Extension

Related news


terça-feira, 5 de maio de 2020

RECONNAISSANCE IN ETHICAL HACKING

What is reconnaissance in ethical hacking?
This is the primary phase of hacking where the hacker tries to collect as much information as possible about the target.It includes identifying the target ip address range,network,domain,mail server records etc.

They are of two types-
Active Reconnaissance 
Passive Reconnaissance 

1-Active Reconnaissance-It the process from which we directly interact with the computer system to gain information. This information can be relevant and accurate but there is a risk of getting detected if you are planning active reconnaissance without permission.if you are detected then the administration will take the severe action action against you it may be jail!

Passive Reconnaissance-In this process you will not be directly connected to a computer system.This process is used to gather essential information without ever interacting with the target system.

Related news


  1. Hacking Growth Sean Ellis
  2. Hacking Windows: Ataques A Sistemas Y Redes Microsoft
  3. Hacking Tor Whatsapp
  4. Hacking Desde Cero
  5. Hacking Background
  6. Pagina Hacker

ADVANTAGE OF ETHICAL HACKING

Advantage of Ethical Hacking

Hacking is quite useful in the following purpose-

1-To recover lost information, especially in case you lost your password.

2-To perform penetration testing to strengthen computer and network security.

3-To put adequate preventative measure in place to prevent security breaches.

4-To have a computer system that prevents malicious hackers from gaining access.

5-Fighting against terrorism and national security breaches.


Continue reading


  1. Curso Hacking Etico Gratis
  2. Hacking Cracking
  3. Hacking Pages
  4. Hacking Wireless 101 Pdf
  5. Tipos De Hacker
  6. Hacking Smart Tv
  7. Diferencia Entre Hacker Y Cracker
  8. Growth Hacking Tools
  9. Hacking Definicion
  10. Hacking Team
  11. Hacking System

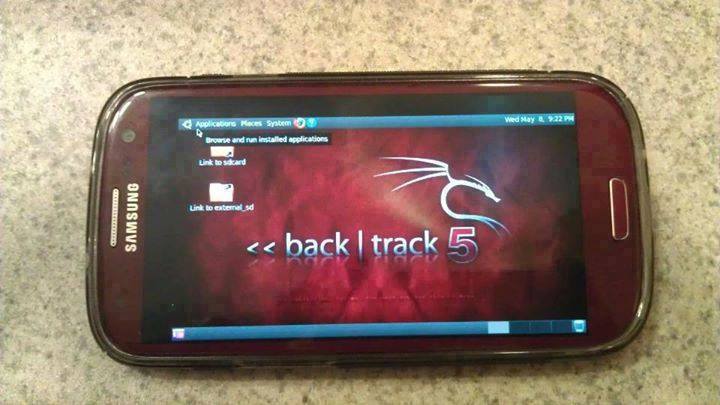
How To Install And Run Backtrack On Android

Guide you step by step to How to install and run Backtrack on android. As the Backtrack is also available with ARM architecture which makes it possible to run Backtrack on an ARM machine such as mobiles or tablets.
Recently, We are discussed Install and Run BackTrack on Windows. Android is the best OS for penetration testing. It designed for digital forensics and penetration testing or hacking tool. It comes with many more updated tools. As the Backtrack is also available with ARM architecture which makes it possible to run Backtrack on an ARM machine such as mobiles or tablets.
How To Install and Run Backtrack On AndroidRequirements
Step to Install and Run Backtrack On Android:
First of all extract the BT5-GNOME-ARM.7z. and copy the "BT5" folder and then put in your phone's root directory. Here mine phone is /sdcard. The root directory is different for different mobile devices.
  • Now install all the above apps BusyboxAndroid TerminalAndroid Vnc.
  • After installing BusyBox application open it and wait until it finishes loading and then click on Smart install.
  • Now open the android terminal and type the following command:
    su cd /sdcard/BT5sh bootbtNOTE :- When you type su in terminal it will ask you for superuser request and you have to tap on Grant.
  • After this, type the following commands in terminal.
    export USER=rootvncpasswd
  • After entering vncpasswd the terminal will ask you to enter the password. Enter the desired password and hit enter.
  • Now type the following commands.
    tightvncserver -geometry 1280×720
  • The terminal emulator will create the localhost to connect it to VNC server. Now note the localhost port marked red below. Now minimize the terminal emulator.
  • Open the Android VNC and type the following settings.
Nickname : BT5
Password : your password here which you entered in terminal (step no.6)
Address : localhost
Port : 5906
NOTE: Make sure that your localhost's port matches with terminal's localhost. Here mine New 'X' desktop is localhost:6. You may be different. So, in VNC type Port 590X where the "X" is the localhost in the android terminal.
That's it now just tap on connect to run the Backtrack on your android. So in this way you successfully install and run backtrack 5 on android. If you face any problem feel free to discuss in below comments!

Read more


Save Your Cloud: Gain Root Access To VMs In OpenNebula 4.6.1


In this post, we show a proof-of-concept attack that gives us root access to a victim's VM in the Cloud Management Platform OpenNebula, which means that we can read and write all its data, install software, etc. The interesting thing about the attack is, that it allows an attacker to bridge the gap between the cloud's high-level web interface and the low-level shell-access to a virtual machine.

Like the latest blogpost of this series, this is a post about an old CSRF- and XSS-vulnerability that dates back to 2014. However, the interesting part is not the vulnerability itself but rather the exploit that we were able to develop for it.

An attacker needs the following information for a successful attack.
  • ID of the VM to attack
    OpenNebula's VM ID is a simple global integer that is increased whenever a VM is instantiated. The attacker may simply guess the ID. Once the attacker can execute JavaScript code in the scope of Sunstone, it is possible to use OpenNebula's API and data structures to retrieve this ID based on the name of the desired VM or its IP address.
  • Operating system & bootloader
    There are various ways to get to know a VMs OS, apart from simply guessing. For example, if the VM runs a publicly accessible web server, the OS of the VM could be leaked in the HTTP-Header Server (see RFC 2616). Another option would be to check the images or the template the VM was created from. Usually, the name and description of an image contains information about the installed OS, especially if the image was imported from a marketplace.
    Since most operating systems are shipped with a default bootloader, making a correct guess about a VMs bootloader is feasible. Even if this is not possible, other approaches can be used (see below).
  • Keyboard layout of the VM's operating system
    As with the VMs bootloader, making an educated guess about a VM's keyboard layout is not difficult. For example, it is highly likely that VMs in a company's cloud will use the keyboard layout of the country the company is located in.

Overview of the Attack

The key idea of this attack is that neither Sunstone nor noVNC check whether keyboard related events were caused by human input or if they were generated by a script. This can be exploited so that gaining root access to a VM in OpenNebula requires five steps:
  1. Using CSRF, a persistent XSS payload is deployed.
  2. The XSS payload controls Sunstone's API.
  3. The noVNC window of the VM to attack is loaded into an iFrame.
  4. The VM is restarted using Sunstone's API.
  5. Keystroke-events are simulated in the iFrame to let the bootloader open a root shell.

Figure 1: OpenNebula's Sunstone Interface displaying the terminal of a VM in a noVNC window.

The following sections give detailed information about each step.

Executing Remote Code in Sunstone

In Sunstone, every account can choose a display language. This choice is stored as an account parameter (e.g. for English LANG=en_US). In Sunstone, the value of the LANG parameter is used to construct a <script> tag that loads the corresponding localization script. For English, this creates the following tag:
<script src="locale/en_US/en_US.js?v=4.6.1" type="text/javascript"></script>
Setting the LANG parameter to a different string directly manipulates the path in the script tag. This poses an XSS vulnerability. By setting the LANG parameter to LANG="onerror=alert(1)//, the resulting script tag looks as follows:
<script src="locale/"onerror=alert(1)///"onerror=alert(1)//.js?v=4.6.1" type="text/javascript"></script>
For the web browser, this is a command to fetch the script locale/ from the server. However, this URL points to a folder, not a script. Therefore, what the server returns is no JavaScript. For the browser, this is an error, so the browser executes the JavaScript in the onerror statement: alert(1). The rest of the line (including the second alert(1)) is treated as comment due to the forward slashes.

When a user updates the language setting, the browser sends an XMLHttpRequest of the form
{ "action" : { "perform" : "update", "params" : { "template_raw" : "LANG=\"en_US\"" } }}
to the server (The original request contains more parameters. Since these parameters are irrelevant for the technique, we omitted them for readability.). Forging a request to Sunstone from some other web page via the victim's browser requires a trick since one cannot use an XMLHttpRequest due to restrictions enforced by the browser's Same-Origin-Policy. Nevertheless, using a self-submitting HTML form, the attacker can let the victim's browser issue a POST request that is similar enough to an XMLHttpRequest so that the server accepts it.

An HTML form field like
<input name='deliver' value='attacker' />
is translated to a request in the form of deliver=attacker. To create a request changing the user's language setting to en_US, the HTML form has to look like
<input name='{"action":{"perform":"update","params":{"template_raw":"LANG' value='\"en_US\""}}}' />
Notice that the equals sign in LANG=\"en_US\" is inserted by the browser because of the name=value format.

Figure 2: OpenNebula's Sunstone Interface displaying a user's attributes with the malicious payload in the LANG attribute.

Using this trick, the attacker sets the LANG parameter for the victim's account to "onerror=[remote code]//, where [remote code] is the attacker's exploit code. The attacker can either insert the complete exploit code into this parameter (there is no length limitation) or include code from a server under the attacker's control. Once the user reloads Sunstone, the server delivers HTML code to the client that executes the attacker's exploit.

Prepare Attack on VM

Due to the overwritten language parameter, the victim's browser does not load the localization script that is required for Sunstone to work. Therefore, the attacker achieved code execution, but Sunstone breaks and does not work anymore. For this reason, the attacker needs to set the language back to a working value (e.g. en_US) and reload the page in an iFrame. This way Sunstone is working again in the iFrame, but the attacker can control the iFrame from the outside. In addition, the attack code needs to disable a watchdog timer outside the iFrame that checks whether Sunstone is correctly initialized.

From this point on, the attacker can use the Sunstone API with the privileges of the victim. This way, the attacker can gather all required information like OpenNebula's internal VM ID and the keyboard layout of the VM's operating system from Sunstone's data-structures based on the name or the IP address of the desired VM.

Compromising a VM

Using the Sunstone API the attacker can issue a command to open a VNC connection. However, this command calls window.open, which opens a new browser window that the attacker cannot control. To circumvent this restriction, the attacker can overwrite window.open with a function that creates an iFrame under the attacker's control.

Once the noVNC-iFrame has loaded, the attacker can send keystrokes to the VM using the dispatchEvent function. Keystrokes on character keys can be simulated using keypress events. Keystrokes on special keys (Enter, Tab, etc.) have to be simulated using pairs of keydown and keyup events since noVNC filters keypress events on special keys.

Getting Root Access to VM

To get root access to a VM the attacker can reboot a victim's VM using the Sunstone API and then control the VM's bootloader by interrupting it with keystrokes. Once the attacker can inject commands into the bootloader, it is possible to use recovery options or the single user mode of Linux based operating systems to get a shell with root privileges. The hardest part with this attack is to get the timing right. Usually, one only has a few seconds to interrupt a bootloader. However, if the attacker uses the hard reboot feature, which instantly resets the VM without shutting it down gracefully, the time between the reboot command and the interrupting keystroke can be roughly estimated.

Even if the bootloader is unknown, it is possible to use a try-and-error approach. Since the variety of bootloaders is small, one can try for one particular bootloader and reset the machine if the attack was unsuccessful. Alternatively, one can capture a screenshot of the noVNC canvas of the VM a few seconds after resetting the VM and determine the bootloader.

A video of the attack can be seen here. The browser on the right hand side shows the victim's actions. A second browser on the left hand side shows what is happening in OpenNebula. The console window on the bottom right shows that there is no user-made keyboard input while the attack is happening.